
Skulltronix offers two highly customizable DMX protocol Servo Controllers.
| The Board of Chuckee (aka BOC) | The Son of Chuckee (aka SOC) |
|
|
Both controllers offer exclusive features essential for creating reliable animatronics:
-
DMX compatibility: DMX is the standardized wiring system used in theaters and stages throughout the world. The cabling is simple.
You just run DMX cables from one device to another. Each device gets assigned a DMX
base address. Some devices require multiple DMX addresses. Like the RGB Leds in our boards. They require one address each for brightness, red,
green, and blue. There are many types of DMX devices including lighting, strobes, fire/fog/haze/snow machines, video players, sound players,
relays, dimmers and much more.
Because the SOC and BOC are DMX compatible you can control them with almost any of the hundreds of DMX control systems and software packages on the market.
- Individually configurable servo limits.
-
Individually configurable servo direction. Why change direction?
Two examples:
You decide to change from one servo brand to another and the two brands sell servos that move opposite to each other.
Or you have servos in the left and right arms of a character and in both arms you want low values to move the arm down and high values to be up movement.
-
Individually configurable travel degree (90 vs 180).
-
Servo End Points: You can easily configure the BOC/SOC to keep servos from traveling past whatever end points you want.
Usually servos use only a limited portion of their range within their particular mechanical environment. Sometimes going past that range can break things.
With the limits of travel set in the board, your animatronic is protected from over-travel (and ignorant users).
You could find programmable servos that have the ability to set their travel limits. But they are more expensive. With the BOC/SOC ability to set travel limits you can often use less
expensive analog servos in the same projects.
-
Individually configurable resolution. (8 bit or 10 bit).
Our boards ship with 10 bit (hi-res) configuration as the default. This gives them a higher resolution of movement. Servos configured as 8 bit have a maximum number of travel steps of 255. 10 bit servos have 1024 definable positions. 255 sounds like a lot? Well, if your servo travel is limited to just 25% of its possible range then your animation will only have 64 possible steps.
For some projects that creates noticeable jerkiness to the animation. With 10 bit (hi-res) servos each servo occupies two DMX addresses. Only the lower address is used in the animation software. If your controller or software does not support hi-res then you should reconfigure the servos to 8 bit (lo-res). There are two popular animation programs that support hi-res servos: VSA and VenueMagic.
-
Individually configurable trim factor
-
Individually configurable DMX address (above base address)
-
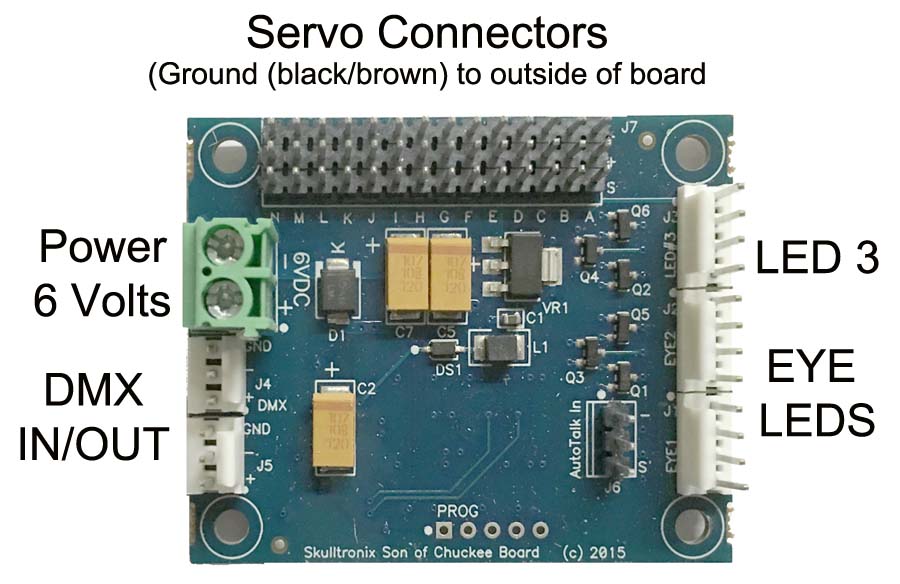
Two configurable DMX RGB LED ports for animatronic eyes with configurable Color Balance and DMX Address. In addition the SOC
board has one extra separately definable LED port for other use such as a beating heart.
There are several configurable options for the RGB LEDs: DMX Address: The LEDs use 4 DMX channels (both eye connectors are on the same DMX addresses):
Brightness/Strobe: Values from 0-127 make the LEDs strobe at the rate you set: Values from 128-255 set the overall brightness of the LEDs. Red: 0-255 Green: 0-255 Blue: 0-255 Color Balance can be set for each of the colors (RGB) separately using the Skulltronix Configuration Program
- Configurable Power timeout. The boards will automatically turn off the servos after a specified time. The default is one minute. On the BOC board the PWM signal gets shut off. On the SOC board the actual power gets turned off.
Which Servo Controller should you choose?
There are four major reasons to choose the SOC Board over the BOC board:
-
If you use digital servos:
Digital servos typically DO NOT shut down when the PWM (control) signal is lost, such as at the end of an animation routine. This causes them to remain under load which results in the life of the servo being shortened dramatically. The SOC board powers down the servos and makes sure they rest and cool off.
Further, upon power-up, digital servos can suck up so much power that the voltage to the control board itself is lowered, causing the control board to reset and start over. To fix this issue the SOC board gradually feeds the power into the servos to allow a graceful and trouble free powerup. To our knowledge no other servo controller on the market provides this feature. -
Use the SOC board if you intend to use our LiveAction option. LiveAction allows you to interact
with your audience live or to use a live actor to create and save animation rather than hand-coding the animation.
The SOC has a direct input port for plugging in an Autotalk board (included with the LiveAction option) and also includes onboard circuitry that automatically and seamlessly switches between onboard control and Autotalk control. Which means.. if you are running pre-recorded animation/s using our ShowMaster option and want to interrupt and interact with the crowd you can by just clicking on "CONNECT" in the TrackSkull software.
- A third LED port.
- If you need 6 volts - choose he SOC board. The BOC is a 5 volt only board. Note: Almost all rc servos will run at 6 volts. Some will NOT run at 5 volts. For those servos that will run at either 5 or 6 volts you will see a dramatic increase of both speed and torque by stepping up to 6 volts. DO NOT use 6 volts with the BOC board.
Frequently asked questions:
- Q: How do I use the Skulltronix Configuration Program?
A: You will need to connect your BOC/SOC board to your Windows PC using a USB-DMX interface. Specifically an interface compatible with the Enttec Open or Enttec Pro interfaces. From the USB-DMX interface run a 3 pin DMX cable to the BOC/SOC board. Then connect the appropriate power supply to the BOC/SOC board you are testing.
Take a look at this screen shot of the Skulltronix Configuration Program:
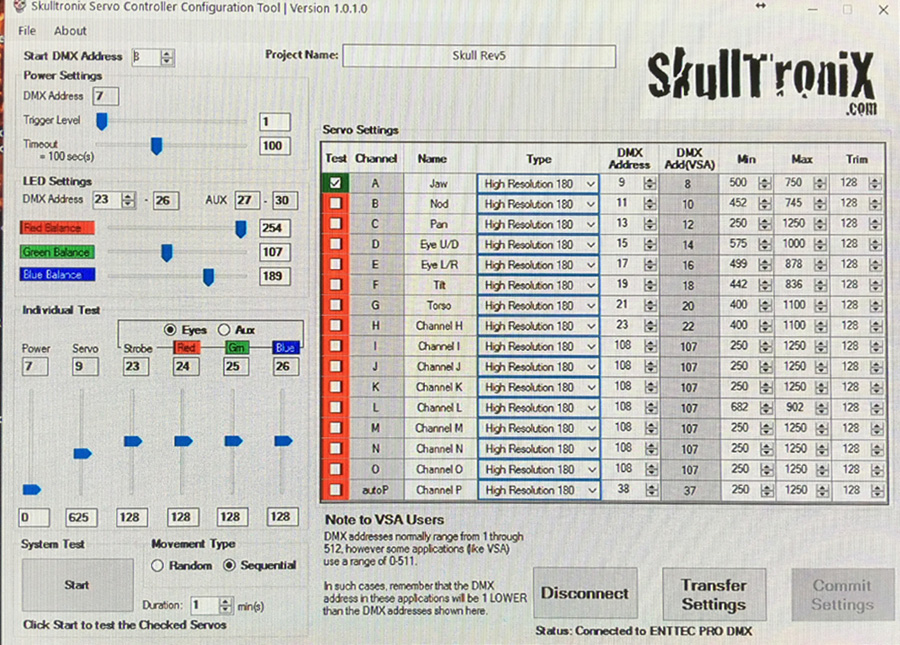
The values shown are the default values for Skulltronix DMX Skulls.
Starting from the upper left:
-
Under FILE: LOAD CONFIGURATION FILE - allows you to load a previously saved configuration. This is especially important if you have more than one animatronic and the settings differ.
-
Under FILE: SAVE CONFIGURATION FILE - obvious. If you make changes save them!
-
Under FILE: LOAD AND SAVE DEFAULTS - Handy if you create more than one of the exact same project or only have one.
-
PROJECT NAME - give your character a name. Optional
-
START DMX ADDRESS - this is the base address of the entire board. Usually set at 8. Why not 1? Because we reserve the first 8 addresses for configuration use.
-
POWER SETTINGS DMX ADDRESS - The power relay default address is one lower than the base address. It behaves as a simple single channel DMX relay and
controls power (SOC) or PWM (BOC) The power relay exists to save the servos from excessive heat and wear. You MUST send a power on command
at the beginning of your
animation unless your animation software has a default value set to 0 (zero) for this DMX address. At the end of your animation you can send a 1 (one) to the
relay to turn power off or simply let the timer take over.
-
POWER SETTINGS SLIDER TRIGGER LEVEL - Not a function we actually ever use. Leave it at zero.
-
POWER SETTINGS TIMEOUT - Defaults to 100 seconds. When the DMX signal stop coming from your controller the relay will power off
your servos at the given lapse of time.
-
LED SETTINGS DMX ADDRESS - The Leds take up 4 DMX addresses. You can set them here.
-
LED SETTINGS COLOR SLIDERS - you can adjust the color balance of the LEDs. Rarely used by us.
-
INDIVIDUAL TEST POWER - the slider allows you to test the power on/off feature. Handy to use if you want to go to lunch in the midst of configuring a board. Power off and walk away!
-
INDIVIDUAL TEST SERVO - This allows you to test the servo which has the green highlight under SERVO SETTINGS TEST. The highest checked servo gets tested. Use this to test how far your servos can move without causing "issues" and transfer those settings to the SERVO LIMITS. Also handy for just testing servos individually.
-
INDIVIDUAL TEST EYES AND AUX -
STROBE - 0-128 are strobe values. 129-255 are brightness values. We usually leave this at the highest value and test RGB separately with their own sliders.
-
RED GREEN BLUE SLIDERS - 0 is OFF, 255 is full brightness.
-
SYSTEM TEST - All checked servos under the TEST column will be tested. Select RANDOM or SEQUENTIAL. You can set the duration of the test. The default is one minute.
-
SERVO SETTINGS TEST COLUMN - select the servo/s to test.
-
SERVO SETTINGS CHANNEL - The servo boards are labeled to match. Note: The BOC board has 16 servo ports. The SOC has 14 servo ports but has one hidden port P which is a relay used to switch Autotalk <> Onboard Jaw Control. See TrackSkull for more info.
-
SERVO SETTINGS NAME - Change the names of the servos to match your project.
- SERVO SETTINGS DMX ADDRESS - each 8 lo-res or raw servo uses one DMX channel. Each HI-RES servo uses two channels. If you are using hi-res be sure to allow for that invisible channel. Note each one in the default is two above the previous. All addresses must be above the base address.
- SERVO SETTINGS DMX ADDRESS VSA - this column simply explains what address your servo will be set at when using the VSA animation program, which for some damned reason is incorrectly off by one.
- SERVO SETTINGS MIN MAX - this is where you set the travel limits of your servo. For VSA users the hi-res range is 250-1250. Lo-res is 0-255.
- SERVO SETTINGS TRIM - Once you get your project together you might find a servo doesn't move to the precise locations for one direction or the other. TRIM allows you to do fine tuning without opening up your creation and fiddling with connectors. We typically use this for getting the jaw closure just right.
- DISCONNECT / CONNECT BUTTON - this allows you to shut off power and dmx to the servos and reconnect to do more work.
- TRANSFER SETTINGS - changes in DMX addresses, servo settings, and LED settings don't take effect until TRANSFERRED to the BOC/SOC board. Make a change - transfer - test change. Once you like the changes time to: COMMIT SETTINGS - this burns the changes into the BOC/SOC board. Now, even if you have a power outage the changes will be there.
WARNING: EVERY BOC/SOC board currently on the DMX chain AND powered up will get the settings! If you only want changes to one board be sure to power down the other boards.
- SERVO SETTINGS DMX ADDRESS - each 8 lo-res or raw servo uses one DMX channel. Each HI-RES servo uses two channels. If you are using hi-res be sure to allow for that invisible channel. Note each one in the default is two above the previous. All addresses must be above the base address.
-
Q: Can I run higher voltage servos such as 7.4 or 12 volt servos?
A: Yes, but run your higher voltage power directly to the servos, not through the controller. You'll still need the appropriate (5 or 6 volt) power supply for the controller. Connect your controller ground wire and high voltage ground wire together. And be sure to send the PWM wire from the board to the servo/s. To make it even easier try using one of ServoCity's power boards
-
Q: May I order BOC/SOC parts (cables, power supplies, LEDs) from SkullTroniX?
A: Yes, but there is a minimum order of $25 and parts are NOT returnable. You might get better prices from Mouser or Digikey or other suppliers.
-
Q: I'm trying to use the BOC board with "X" DMX controller/software (not VSA or Venue Magic) and I can't get it to work. What should I do?
A: We don't know. We've never used any DMX controller other than VSA and Venue Magic.
-
Q: What is the warranty on the BOC board?
A: None. Since we have no control over how you will use or misuse the board there is no warranty. If you hook up the power backwards, fail to use static protection or any of a hundred other causes of damage we cannot eat the cost of the replacement. Each board is tested prior to shipment.
-
Q: What is the default configuration for the BOC?
A: See the Configuration screen shot above. It shows the default configuration as it ships. These are actually the default values for our Rev 5 DMX SkullTroniX.
-
Q: How do I use multiple BOC boards on the same DMX chain?
A: Actually, that's a tricky answer. You can set each BOC's base address far enough apart to not overlap. Example: A SkullTroniX DMX skull uses 6 2-channel (hi-resolution) servos. Therefore the servos eat up 12 DMX channels. There is one DMX channel for the power saver circuit, 4 DMX channels for the eye lights. That totals 17 DMX channels. If your first skull is at DMX base address 8 the next skull should be at base address 30 (or higher - leaving room for an additional torso servo).
OR: You can leave the base address (and power) the same and just change the addresses of the servos and leds. You are allowed to have servos on separate boards have the SAME address if you want them to behave identically. Same goes for power and LED settings. - Q: I'm using a linear actuator (servo) from ServoCity and I'm getting erratic servo behavior on other servos. What gives?
A: ServoCity decided to put +5 volts on their actuators to power BEC devices (which we don't need). Just cut the red wire from the servo connector coming out of the linear actuator. You don't need that extra power going to the controller.
- LED Specifications: Nichia part number NSTM515AS
- BOC Board specifications
- BOC/SOC Cable Parts
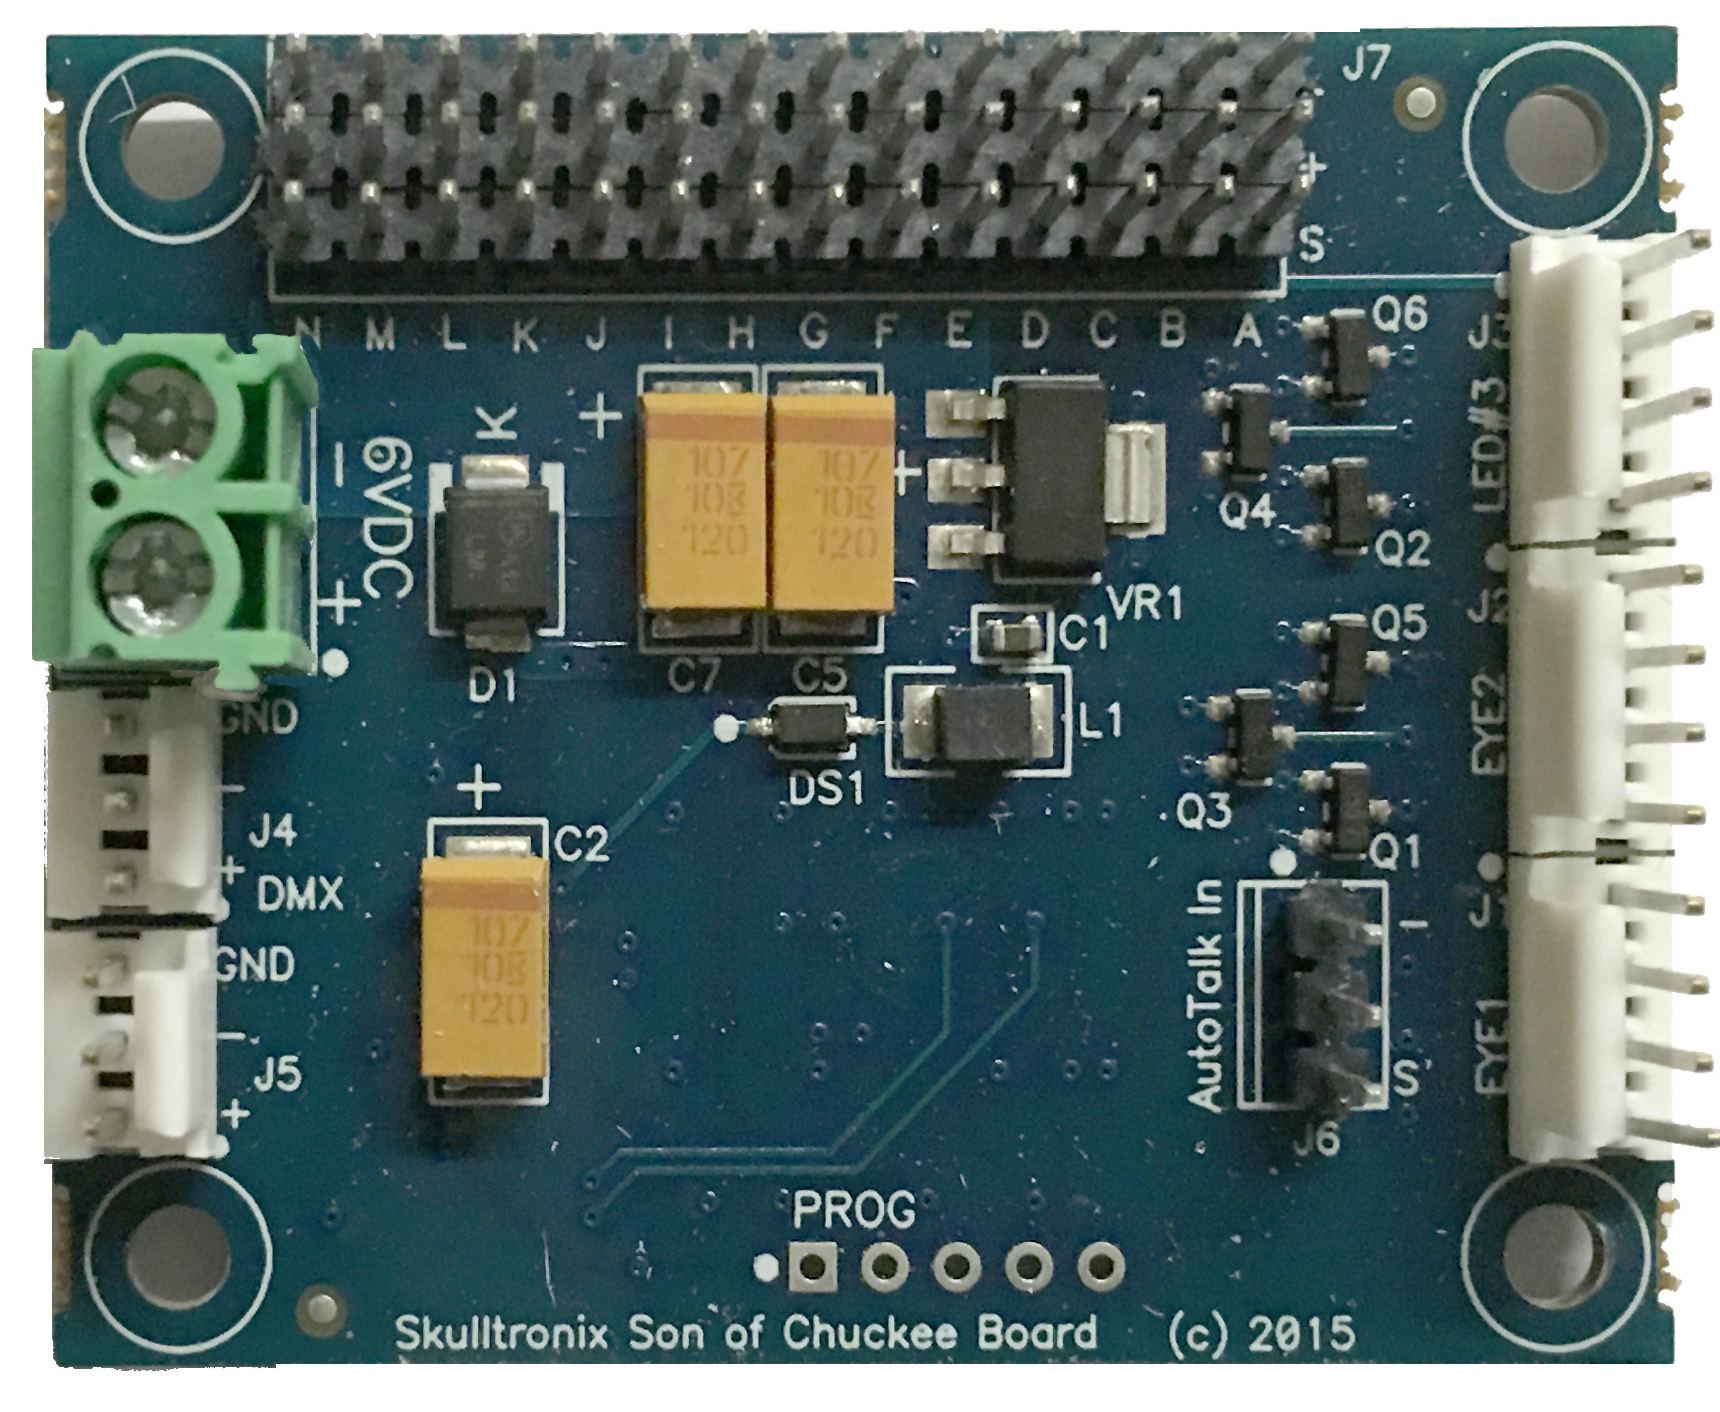
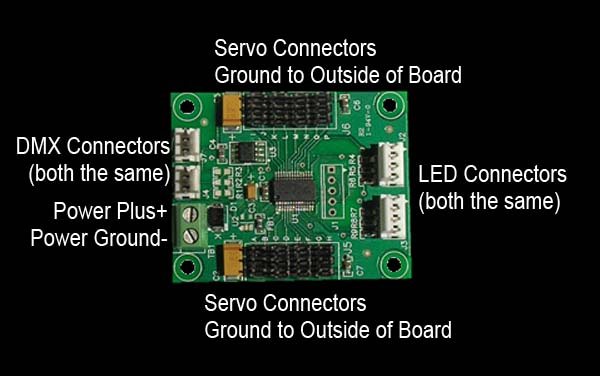
Board of Chuckee (BOC) Wiring:
-
Under FILE: LOAD CONFIGURATION FILE - allows you to load a previously saved configuration. This is especially important if you have more than one animatronic and the settings differ.
-
Son of Chuckee (SOC) Wiring Diagram